Product Overview
The Honeywell FocusPRO TH6110D1005 is a programmable thermostat designed for 1 Heat/1 Cool systems‚ offering precise temperature control and manual or auto changeover functionality.
1.1. Product Application
The Honeywell FocusPRO TH6110D1005 programmable thermostat is designed for use with 24 VAC single-stage heating and cooling systems‚ as well as 750 mV heating systems. It provides electronic control for precise temperature management‚ making it suitable for residential applications. The thermostat is compatible with 1 Heat/1 Cool systems and offers both manual and automatic changeover options. Its programmable features allow for customized temperature settings‚ enhancing energy efficiency and comfort. This thermostat is ideal for homeowners seeking reliable and flexible temperature control solutions.
1.2. System Types
The Honeywell FocusPRO TH6110D1005 is compatible with single-stage 24 VAC heating and cooling systems‚ as well as 750 mV heating systems. It supports systems requiring precise temperature control‚ such as gas furnaces‚ heat pumps‚ and air conditioning units. The thermostat is designed for 1 Heat/1 Cool configurations‚ ensuring compatibility with standard residential HVAC setups. Its versatility allows it to function effectively in various heating and cooling scenarios‚ providing consistent performance across different system types. This makes it a reliable choice for a wide range of home environments.
Pre-Installation Requirements
Ensure compatibility with 1 Heat/1 Cool systems and verify installer qualifications. Check wiring for shorts and confirm system type matches installed equipment. Proper setup in Installer Settings is essential.
2.1. Compatibility Check
Ensure the Honeywell TH6110D1005 is compatible with your HVAC system‚ specifically 1 Heat/1 Cool configurations. Verify compatibility with 24 VAC or 750 mV systems; Check wiring compatibility to avoid shorts and ensure proper connections. Confirm the system type matches the installed equipment. Installer must verify these settings in the Installer Setup menu‚ particularly Function 1 (System Type). Proper compatibility ensures safe and efficient operation. Failure to check compatibility may result in system malfunctions or damage. Always refer to the installation manual for detailed specifications.
2.2. Installer Qualifications
The Honeywell TH6110D1005 must be installed by a trained‚ experienced service technician. Installers should have expertise in HVAC systems and electrical wiring. Proper training ensures compliance with safety standards and correct system setup. Improper installation can lead to malfunctions or safety hazards. The installer must carefully follow the manual instructions and verify all settings before completing the job. This ensures optimal performance and avoids potential damage to the thermostat or HVAC system. Always ensure the installer is qualified to handle such installations.
Installation Steps
The installation involves wallplate mounting‚ wiring the thermostat‚ and setting up power options. Ensure all steps are followed carefully for proper system functionality.
3.1. Wallplate Mounting
The wallplate must be mounted level and plumb on the wall. Remove the wallplate from the thermostat and insert the quick reference card into the slot on the back. Pull the wires through the wire hole and position the wallplate. Snap the wallplate into place‚ ensuring it is securely fastened. Use drywall anchors if necessary for a sturdy installation. Once mounted‚ connect the wires to the appropriate terminals and complete the installation. The wallplate should be installed without the batteries to avoid any accidental power issues during setup.
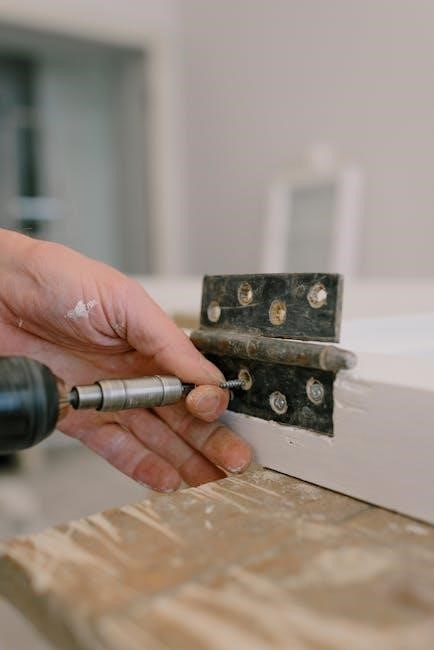
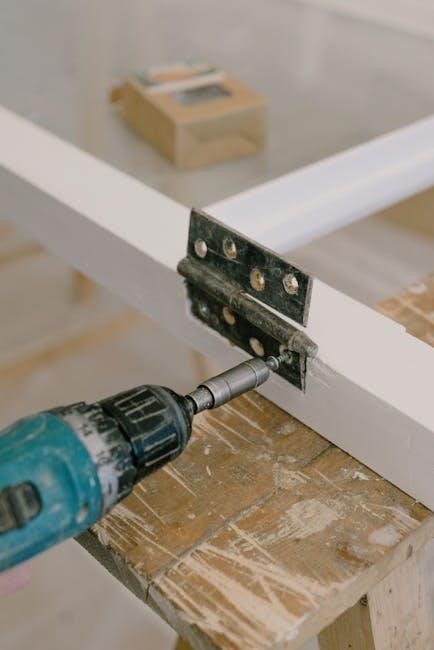
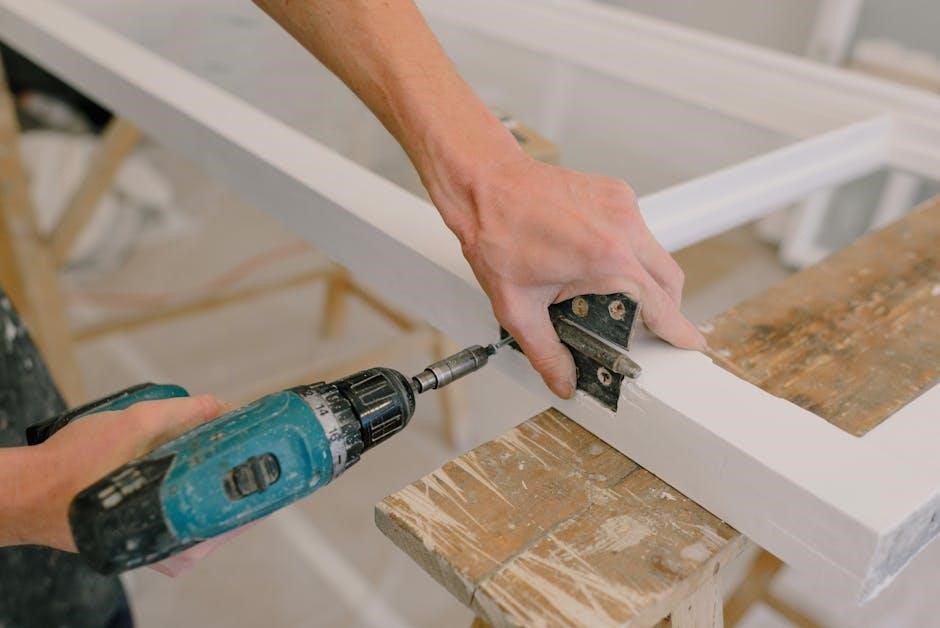
3.2. Wiring Instructions
Connect the wires to the appropriate terminals on the thermostat. Match the wires from your heating and cooling system to the correct terminals (R‚ W‚ Y‚ G‚ etc.). Ensure no wires are shorted together. Use the provided wiring chart for accuracy. Secure all connections tightly. After wiring‚ replace the wallplate and insert the batteries. Turn the power on and test the system to ensure proper operation. Always follow safety guidelines to avoid electrical hazards. Verify that the wiring matches the system type specified in the Installer Setup menu.
3.3. Power Options Setup
Insert the batteries into the thermostat’s battery holder‚ ensuring they are properly seated. Use the specified battery type for optimal performance. If using a hardwired power source‚ connect the appropriate wires to the designated terminals. Verify the power source matches the system requirements. After installing the batteries or connecting the power‚ replace the wallplate and test the thermostat’s functionality. Ensure all power options are configured correctly in the Installer Setup menu to maintain consistent operation. Proper power setup is crucial for reliable performance and functionality of the thermostat.
System Configuration
Configure the system settings through the Installer Setup menu‚ selecting options like manual or auto changeover. Set the system type to match the installed equipment.
4.1. System Settings (Manual or Auto Changeover)
Access the Installer Setup menu to configure system settings. Select Function 12 to choose between Manual or Auto Changeover modes. Manual mode allows constant temperature‚ while Auto Changeover enables the system to switch between heating and cooling automatically. Ensure the setting matches your HVAC equipment. Proper configuration is crucial for efficient operation. Use the Up or Down arrows to adjust settings. Refer to the manual for detailed steps to avoid errors during setup. This ensures optimal performance and energy efficiency.
4.2. Scheduling and Programming
The Honeywell TH6110D1005 allows users to set custom schedules for heating and cooling. Use the thermostat’s menu to program temperature settings for different times of the day. Access the scheduling menu by pressing the appropriate buttons and use the Up/Down arrows to adjust temperatures. Ensure the schedule aligns with your system type (heating or cooling). Save settings to maintain consistent comfort levels. Refer to the manual for detailed programming steps to ensure accuracy. Proper scheduling enhances energy efficiency and system performance. Always test the programmed settings to confirm they work as intended.
Safety Precautions
Always ensure proper wiring practices and electrical safety when installing the Honeywell TH6110D1005 to prevent damage or potential hazards. Follow all manufacturer guidelines carefully.
5.1. Electrical Safety
Always disconnect power before starting installation to avoid electric shock. Ensure all wires are properly insulated and not shorted. Follow local electrical codes and manufacturer guidelines. Turn off the main power supply at the circuit breaker or fuse box. Verify that the system is de-energized using a voltage tester. Never touch live wires or components. Use appropriate safety tools and personal protective equipment. Adhere to all safety precautions outlined in the manual to prevent injury or damage to the thermostat or HVAC system.
5.2. Proper Wiring Practices
Ensure all wires are securely connected to the correct terminals on the thermostat and HVAC system. Match wire labels (e.g.‚ R‚ W‚ Y‚ G) to their respective connections. Avoid short circuits by keeping wires insulated and not crossing them. Use the correct gauge and type of wire for the installation. Double-check connections before restoring power. Consult the wiring diagram in the manual for specific configurations. Proper wiring ensures safe and reliable operation of the thermostat and HVAC system‚ preventing malfunctions or damage.

Post-Installation Checks
Verify thermostat installation by checking wire connections and ensuring proper functionality. Test heating and cooling modes to confirm system response. Review user instructions for operation.
6.1. Functional Testing
After installation‚ perform a thorough functional test to ensure the thermostat operates correctly. Test heating‚ cooling‚ and off modes to verify system response. Check the display for proper function and accuracy. Ensure temperature adjustments are responsive and precise. Review user instructions to confirm all features are operational. Verify that manual and auto changeover settings work as intended. If any issues arise‚ refer to the troubleshooting guide or contact a qualified technician for assistance. Proper testing ensures reliable performance and user satisfaction.
6.2. User Instructions and Quick Reference
Provide users with clear instructions for operating the thermostat. Include a quick reference guide for basic operations‚ such as adjusting temperature‚ switching modes‚ and programming schedules. Ensure the instructions are concise and easy to understand‚ covering essential features without overwhelming the user. Highlight key functions like manual override‚ fan control‚ and energy-saving modes. Advise users to refer to the full manual for advanced settings. This section helps users familiarize themselves with the thermostat’s operation‚ ensuring optimal performance and energy efficiency.

Troubleshooting Common Issues
Address display malfunctions by checking wire connections and power supply. For heating/cooling system delays‚ verify wiring integrity and ensure settings match the installed equipment configuration.
7.1. Display Malfunction
If the display is blank‚ ensure the thermostat has power and batteries are installed correctly. A blank or fuzzy display may indicate loose wire connections. Check all wires for secure connections and verify that no wires are shorted. If the display shows incorrect temperature readings‚ calibrate the thermostat by pressing and holding the Up arrow and FAN buttons simultaneously. Reset the thermostat to factory settings if issues persist. Ensure the system type matches the installed equipment configuration in the Installer Setup menu. Addressing these steps should resolve most display-related issues effectively.
7.2. Heating/Cooling System Response
If the heating or cooling system fails to respond‚ verify that the thermostat is properly powered and all wiring connections are secure. Check for shorted wires between terminals‚ as this can prevent system activation. Ensure the system type (heating or cooling) is correctly configured in the Installer Setup menu. If the issue persists‚ review the scheduling and programming settings to confirm they are set accurately. Additionally‚ ensure the power options are correctly configured in the setup menu. If the system still does not respond‚ perform a factory reset by pressing and holding the Up arrow and FAN buttons simultaneously for 10 seconds. This will restore default settings and may resolve the issue. If problems continue‚ consult a qualified technician for further assistance. Always ensure the system type matches the installed equipment configuration‚ as mismatches can lead to non-response. Addressing these steps should help restore proper system functionality and ensure reliable temperature control.
Thank you for following the Honeywell TH6110D1005 installation guide. Proper setup ensures efficient temperature control. For further assistance‚ visit www.honeywell.com/yourhome or call customer support.
8.1. Finalizing the Setup
Once installation is complete‚ verify all settings and connections. Ensure the system type matches your equipment and the changeover mode is set correctly. Test heating and cooling functions to confirm proper operation. Check that wires are securely connected and not shorted. Review scheduling and programming to align with your preferences. Finally‚ secure the thermostat to the wallplate and ensure the quick reference card is inserted for easy user access. This completes the setup process for the Honeywell TH6110D1005 thermostat.
8.2. Resources for Further Assistance
For additional support‚ visit the official Honeywell website at www.honeywell.com/yourhome. Download the complete manual for detailed instructions and troubleshooting guides. Contact Honeywell customer support directly for personalized assistance. If issues persist‚ consider consulting a certified technician for professional help. Ensure to reference the model number‚ TH6110D1005‚ for accurate support. These resources provide comprehensive solutions to address any installation or operational challenges effectively.